How to Make a Collage on Pinterest
Pinterest has a built-in collage tool on both the app and the desktop site. You open the create menu, pick Collage, cut pieces out of pins you like, arrange them on a blank canvas and publish the result as a new pin. Once you have done it once, the whole thing takes about five minutes.
The tricky parts sit before and after those five minutes: finding the button in the first place and getting your finished collage off Pinterest so you can actually use it somewhere else. This guide covers both. For the original source file, use the video downloader.
- What people usually mean by "Pinterest collage"
- Before you open the editor
- Making a collage in the Pinterest app (iPhone and Android)
- Making a collage on desktop
- Can not find the Collage option? Here's why
- What you can (and can not) change after publishing
- Tips for a collage that does not look thrown together
- Using other people pins what's actually okay
- Getting your collage (and your source images) off Pinterest
- When to use a different tool instead
- FAQs
What People Usually Mean by "Pinterest Collage"
This is worth sorting out first because the word gets used for three different things. The built-in tool. This is Pinterest's own Collages feature. You select pins, cut the object you want out of each one and layer those cutouts onto a canvas.
It publishes straight back to Pinterest as a pin. A collage made elsewhere. Some people design in Canva, Photoshop or a similar app, export it as an image, then upload it to Pinterest the normal way.
It's more steps but you get real control over text and spacing. A board that looks like a collage. Saving thirty pins to a board called "Kitchen Ideas" gives you a grid that resembles a collage but it is not one; a board is a collection of separate pins, while a collage is one finished image.
If you are actually just trying to gather ideas in one place rather than build something new, a board is the faster route.
Before You Open the Editor
A couple of checks here save you from troubleshooting something that is not actually broken. Your account type changes where the button lives. On a personal account, Collage sits behind the create icon.
On a business account, it's usually tucked under the menu icon or under Create on your profile page. If a guide does not match what you are seeing, this is the most common reason.
Keep the app updated. Pinterest's own help pages note that collage tools are not available on every device and an outdated app build is the most frequent cause of the option going missing entirely.
You can pull from three sources: pins already on Pinterest, images you upload yourself and cutouts you have made before. That last one is a real time-saver once you have cut out an object, it stays in your library, so it's ready to reuse in your next collage without starting over.
Making a Collage in the Pinterest App (iPhone and Android)
The app version is the fuller one templates, drafts and remixing all live here.
- Open the create menu. Tap the plus icon at the bottom of the screen and choose Collage.
- Pick a starting point. You will see a blank canvas, saved drafts, templates or the option to remix someone else's collage. If it's your first time, start from a template composition is the hardest part and a template hands you one that already works.
- Add your cutouts. Tap the plus icon inside the editor to browse pins by topic, search Pinterest directly or pull from pins you have already saved. Search for the object itself rather than the whole scene "rattan chair" gives you clean product shots, while "living room" gives you full rooms that do not cut out well.
- Cut out what you want. Tap a pin, then tap the specific object to lift it out. Pinterest drops it onto your canvas tap Add to keep it or Edit to adjust the selection. This step matters more than any other for how polished the final collage looks. An object with clean, contrasting edges cuts out cleanly; something the same color as its background tends to come out ragged.
- Layer and arrange. Drag pieces into position, pinch to resize, tap to send forward or backward. It helps to build from the back background elements first, then supporting pieces, then whatever you want the eye to land on last.
- Set the background. A solid color usually reads as more intentional than a busy photo competing with your cutouts.
- Save or publish. Tap Next and you will be able to save it as a draft, download it to your phone or add a title and description and publish it as a pin.
A tip worth taking seriously: save it as a draft first and come back the next day. Once a collage is published, your editing options shrink a lot.
The steps are identical on iPhone and Android; the only difference is where the finished file lands afterward (Photos on iPhone, Gallery or Downloads on Android).
Making a Collage on Desktop
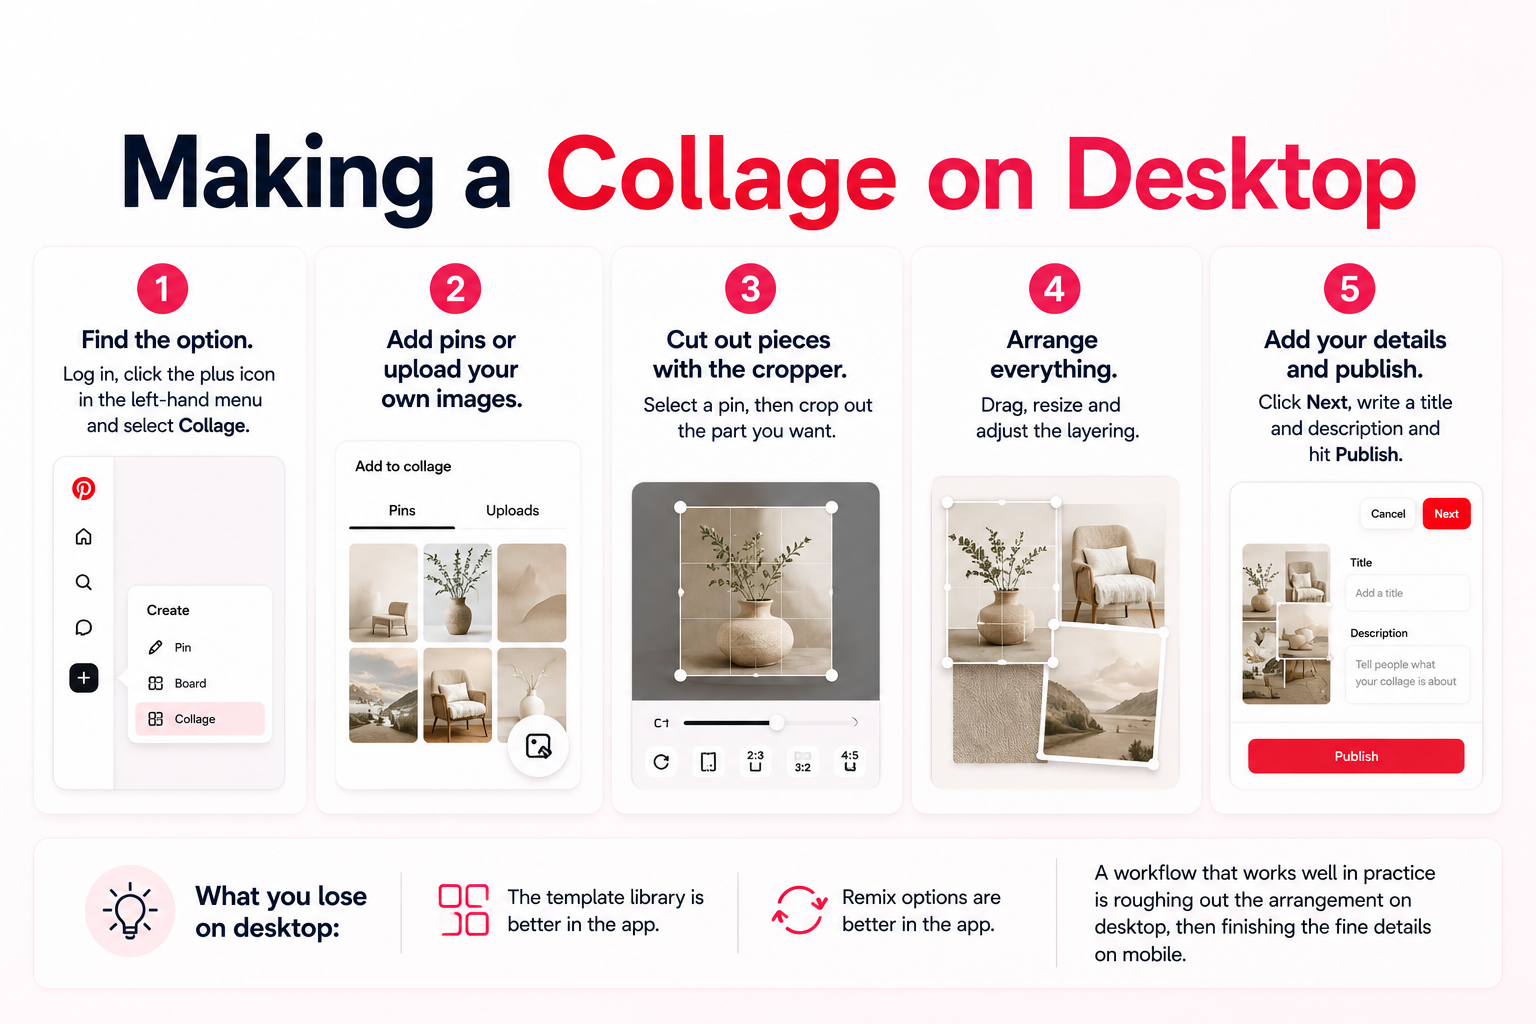
Desktop has fewer templates but gives you more room to work with, which helps on a busy layout.
- Find the option. Log in, click the plus icon in the left-hand menu and select Collage. On a business account, check the menu icon or the Create option on your profile.
- Add pins or upload your own images. Start from an existing pin or use the image icon to bring in your own photos.
- Cut out pieces with the cropper. Select a pin, then crop out the part you want. It's slower than tapping on a phone but a mouse makes precise cropping easier.
- Arrange everything. Drag, resize and adjust the layering. A bigger screen makes spacing issues obvious before you publish rather than after.
- Add your details and publish. Click Next, write a title and description and hit Publish.
What you lose on desktop: the template library and remix options are both better developed in the app. A workflow that works well in practice is roughing out the arrangement on desktop, then finishing the fine details on mobile.
Can not Find the Collage Option? Here's Why
If Collage is not showing up in your create menu, it's almost always one of these, not something you did wrong.
- Outdated app. Update through the App Store or Google Play, then fully close and reopen the app.
- Wrong menu for your account type. Business accounts often hide it under the menu icon or the Create button on your profile rather than the main create icon.
- Limited rollout. Pinterest has said these tools are not available on every device, so a feature you saw in a tutorial might not have reached your region or account yet.
- A temporary glitch on Pinterest's end. This does happen occasionally and usually resolves within a day or two without you needing to do anything.
If your app is current and you have checked both menu locations, try the desktop site; the two rarely go down at the same time.
What You Can (and Can not) Change After Publishing
Once a collage is live, your options narrow considerably. You can edit small things like the title and whether other people are allowed to remix it. The layout itself where each cutout sits is locked.
If the composition is wrong, the only real fix is deleting it and publishing a corrected version. The remix setting is worth thinking about before you publish.
Leaving it on means other people can build on your collage, which can put your work in front of a wider audience through their remixes. Turning it off keeps the composition exclusively yours.
Creators using collages for client or commercial work tend to switch it off; people making mood boards for personal use often leave it on. Drafts, on the other hand, can sit untouched for weeks with no consequences; there's no rush to finish one once it's saved.
Tips for a Collage That Does not Look Thrown Together
The mechanics take a few minutes to learn. Making something that actually looks good takes a bit more care.
- Pick your colors before you pick your pins. Choosing three or four colors up front, then selecting cutouts that fit that palette, tends to hold together better than picking pieces you individually like.
- Start with clean source images. Product photos on plain backgrounds cut out easily. Busy magazine shots, dark interiors and anything blurry will fight you the whole way through.
- If a cutout looks ragged, swap the source pin. It's almost always a low-resolution image, an object that blends into its background or a genuinely difficult edge (hair, leaves, thin chains). Trying a different pin fixes this faster than fiddling with the selection tool.
- Keep the layout simple. One element should clearly be the largest, with everything else supporting it. Leave breathing room at the edges rather than filling every inch.
- Build vertical. Pinterest favors a 2:3 ratio and 1000 x 1500 pixels is the standard working size. A square collage will publish fine but it takes up less space in the feed.
If a finished collage feels a little off and you can not pinpoint why, three quick fixes usually help: cut the number of pieces by about a third, widen the size difference between your biggest and smallest element and swap a busy background for a flat color.
Using Other People Pins What is Actually Okay
Inside Pinterest, this is generally fine. Cutouts and remixing were built into the platform specifically for this kind of reuse, so a collage made from pins and published back to Pinterest fits how the feature is meant to work.
Outside Pinterest is where you need to be more careful. If you are putting a collage into a client presentation, selling it or printing it, the original images still belong to whoever made them.
This is not legal advice and copyright rules vary by country but a reasonable rule of thumb is: if money is attached to the final result, stick to images you own or have properly licensed. Pinterest automatically links a collage back to its source pins, so crediting the original creator when you can costs you nothing.
Getting Your Collage (and Your Source Images) Off Pinterest
Once your collage is finished, you will often want it somewhere other than Pinterest, a portfolio, a client deck, an Instagram post. Your finished collage downloads directly from the same screen where you publish or save a draft and it saves straight to your phone.
Source images are a bit trickier, especially if you are building your collage outside Pinterest in something like Canva or Photoshop, where you need the original files first.
Screenshotting is the obvious workaround but it's a poor one. You lose resolution, sometimes pick up bits of the app interface and end up trying to cut an object out of an already-degraded image.
This is where a proper downloader helps. PinVideo takes a pin link and gives you back the original file with no account, no watermark, no software to install. Paste the link, preview it and download. For videos, the video downloader returns the original MP4, up to 1080p.
For still images, the image downloader returns the full-resolution JPG or PNG, which is what actually makes a clean cutout possible later. For animated pins, saving them the normal way usually flattens the animation into a single still frame the GIF downloader is the only way to keep it moving.
The same personal-use guidance applies here: download freely for your own reference and your own pins and think a bit harder before using someone else's work commercially.When to Use a Different Tool Instead
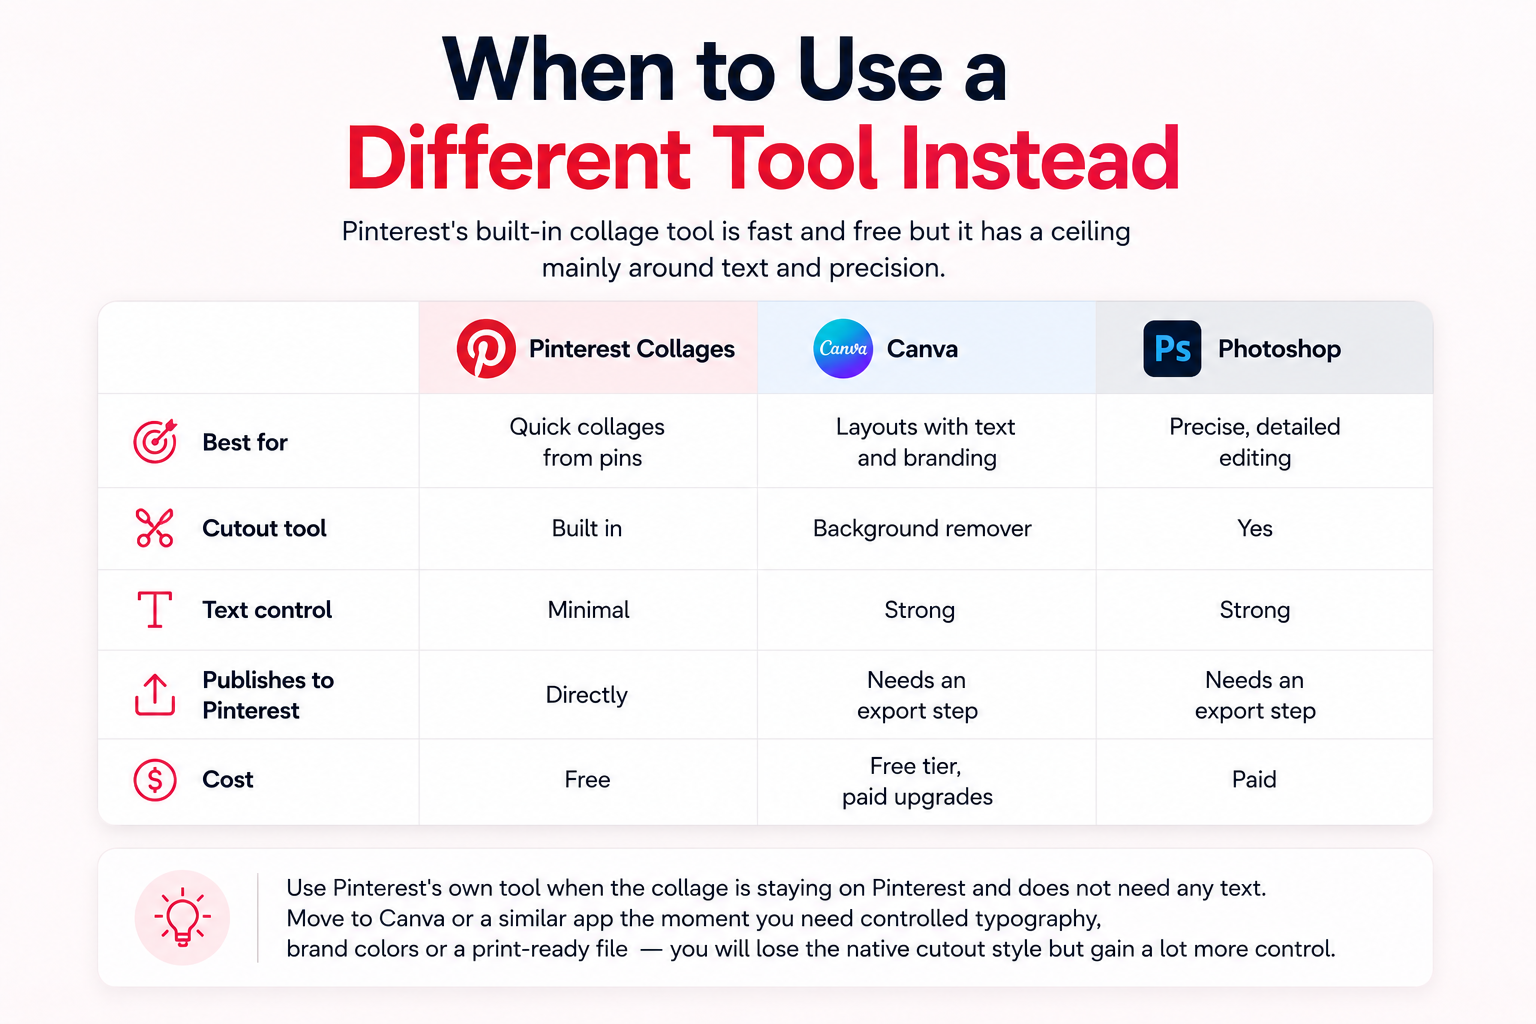
Pinterest's built-in collage tool is fast and free but it has a ceiling mainly around text and precision.
| Pinterest Collages | Canva | Photoshop | |
|---|---|---|---|
| Best for | Quick collages from pins | Layouts with text and branding | Precise, detailed editing |
| Cutout tool | Built in | Background remover | Yes |
| Text control | Minimal | Strong | Strong |
| Publishes to Pinterest | Directly | Needs an export step | Needs an export step |
| Cost | Free | Free tier, paid upgrades | Paid |
Use Pinterest's own tool when the collage is staying on Pinterest and does not need any text. Move to Canva or a similar app the moment you need controlled typography, brand colors or a print-ready file you will lose the native cutout style but gain a lot more control.
Where to Start
Update your app first, so you are not troubleshooting a version problem that was avoidable. Build your first collage from a template rather than a blank canvas, so you can focus on learning the controls instead of composition.
Then save it as a draft and look at it again the next day before publishing. That's the one step that's genuinely hard to undo once it's live.
For source images, use the image downloader. For animated pins, use the GIF downloader.
For source images, use the image downloader. For animated pins, use the GIF downloader.
FAQs
Can I make a Pinterest collage on a laptop?
Yes. Log into Pinterest in a browser, click the plus icon in the left menu and select Collage. Business accounts may need to check the menu icon or the Create button on their profile instead.
Why isn't the Collage option showing up for me?Usually it's an outdated app, an account type where the option is hiding in a different menu or a temporary issue on Pinterest's end. Update and restart the app, check both menu locations and try the desktop site if it still is not there.
Can I edit a Pinterest collage after I have published it?Only partly. You can update the title and the remix setting but the layout and cutouts are locked. To change the composition, you will need to delete it and publish a new version.
Can I use my own photos in a Pinterest collage?Yes you can upload your own images alongside pins from Pinterest, both in the app and on desktop.
How do I save a Pinterest collage to my phone?Use the download option on the screen where you publish or save a draft. If you are trying to save someone else's pin rather than your own collage, a Pinterest downloader will get you the original file instead of a screenshot.
What size should a Pinterest collage be?Vertical, at a 2:3 ratio and 1000 x 1500 pixels is the standard. A square collage will still publish, it just takes up less room in the feed.